Class 7 Maths Chapter 6 Constructions And Tilings Ganita Prakash Part 2 NCERT Solutions Looking for the Class 7 Maths Chapter 6 Constructions And Tilings Ganita Prakash Part 2 NCERT Solutions? You’re in the right place. This chapter helps students understand geometric constructions, patterns, and tiling concepts through easy-to-follow examples and NCERT-based questions.
Figure it Out (Page 140)
1. When constructing the perpendicular bisector, is it necessary to have the same radius for the arcs above and below XY? Explore this through construction, and then justify your answer.
[Hint 1: Any point that is of the same distance from X and Y lies on the perpendicular bisector.
Hint 2: We can draw the whole line if any two of its points are known.]
Solution:
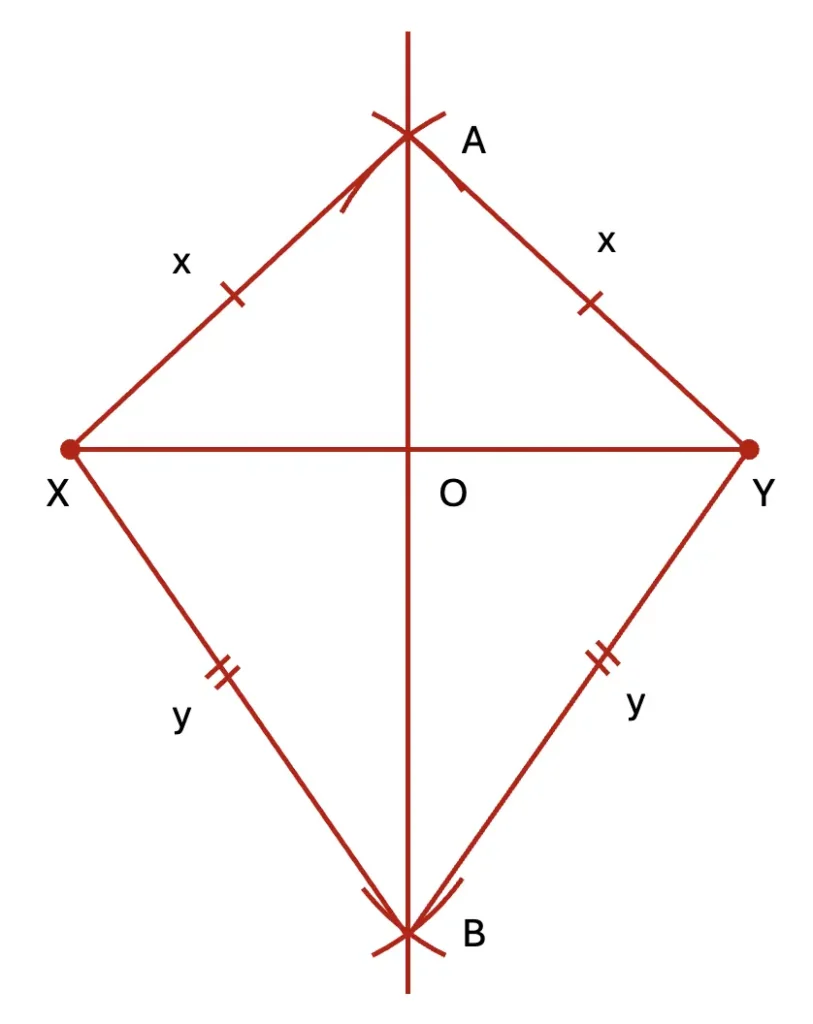
(i) Draw a line segment XY.
(ii) From X and Y, draw arcs of radius ‘x’ above XY and mark their point of intersection as A.
(iii) Again, from X and Y, draw arcs of radius ‘y’ below XY and mark their point of intersection as B.
(iv) Join AB. Let AB intersect XY at O.
(v) Join AX, AY, BX, and BY.
Justification:
△ABX ≅△ABY because AX = AY, BX = BY, and AB is common.
∴ ∠XAB = ∠YAB ……… (by c.p.c.t)
△AOX ≅△AOY because AX = AY, ∠XAO = ∠YAO, AO = AO is common.
∴ ∠AOX = ∠AOY and XO = YO ……… (by c.p.c.t)
∠AOX + ∠AOY = 180° ……….. (linear pair)
∠AOX + ∠AOX = 180°
2∠AOX = 180°
∠AOX = = 90°
Since∠AOX = ∠AOY = 90° and XO = YO.
Thus, AB is the perpendicular bisector of XY.
Since the arcs above and below XY have different radii.
Therefore, it is not necessary to have the same radius for the arcs above and below XY.
2. Is it necessary to construct the pairs of arcs above and below XY? Instead, can we construct both the pairs of arcs on the same side of XY? Explore this through construction, and then justify your answer.
Solution:
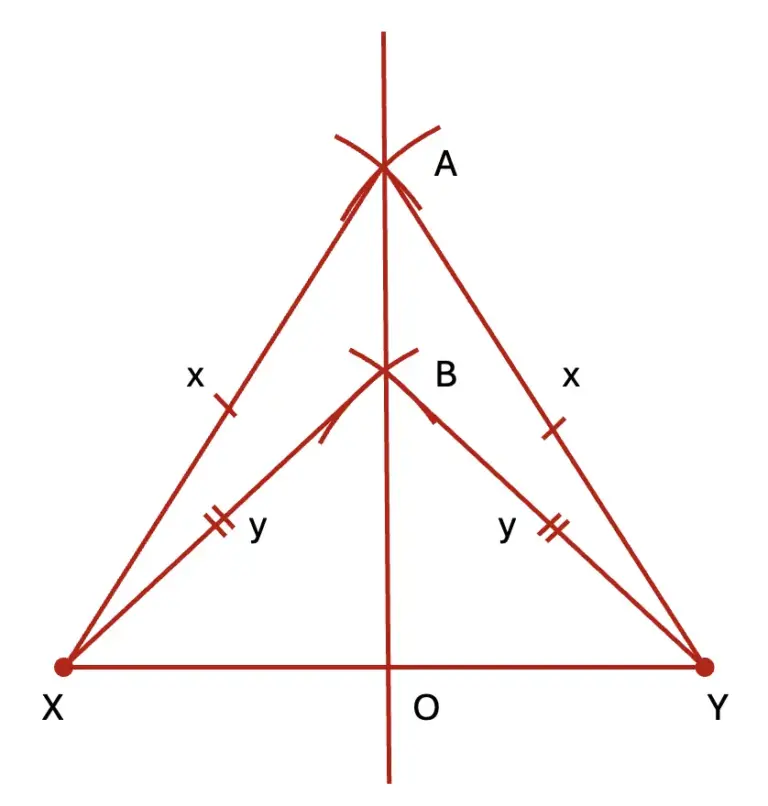
(i) Consider a line segment XY.
(ii) From X and Y, draw arcs of radius ‘x’ above XY and mark their point of intersection as A.
(iii) Again, from X and Y, draw arcs of radius ‘y’ above XY and mark their point of intersection as B.
(iv) Join AB. Extend AB to intersect XY at O.
(v) Join AX, AY, BX, and BY.
Justification:
△ABX ≅△ABY because AX = AY, BX = BY, and AB is common.
∴ ∠XAB = ∠YAB, or ∠XAO = ∠YAO……..(by c.p.c.t)
△AOX ≅△AOY because AX = AY, ∠XAO = ∠YAO, and AB is common.
∴ OX = OY, and ∠AOX = ∠AOY ………(by c.p.c.t)
Also, ∠AOX + ∠AOY = 180° ………..(linear pair)
∠AOX + ∠AOX = 180°
∴ 2∠AOX = 180°
∠AOX = 90°
Since OX = OY and ∠AOX = ∠AOY = 90°.
Thus, AB is the perpendicular bisector of XY.
Since here both pairs of arcs are on the same side of XY.
Therefore, it is not necessary to construct the pairs of arcs above and below XY.
3. While constructing one pair of intersecting arcs, is it necessary that we use the same radii for both of them? Explore this through construction, and then justify your answer.
Solution:
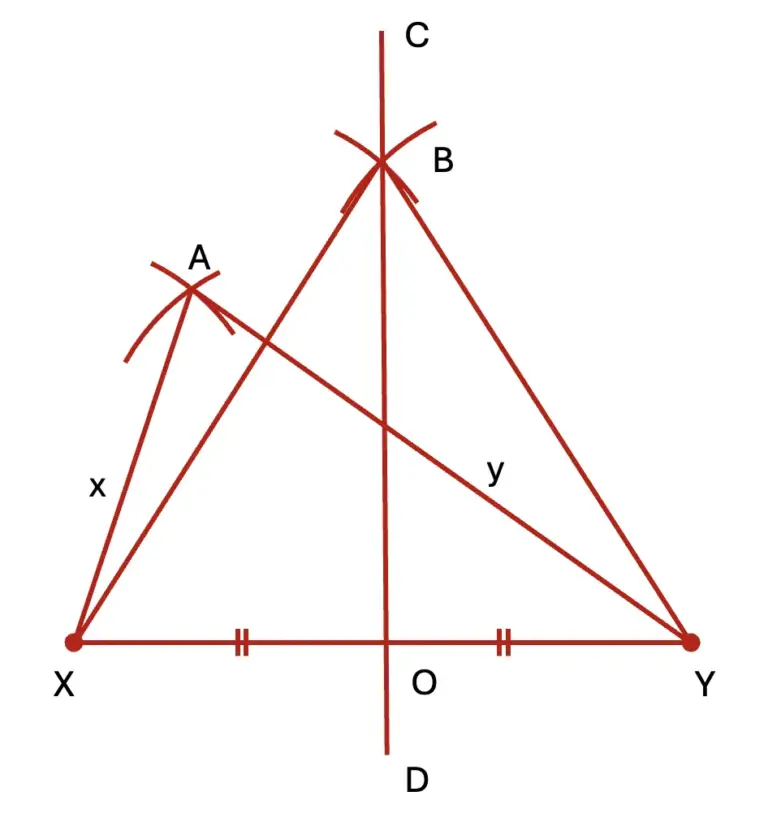
(i) Consider a line segment XY.
(ii) From X draw an arc of radius ‘x’ and an arc of radius ‘y’ from Y and let them intersect at A.
(iii) Let CD be the perpendicular bisector of XY, and B be a point on it.
(iv) Join BX, BY, AX, and AY.
Justification:
△BOX ≅△BOY because ∠BOX = ∠BOY = 90°, XO = YO, and BO is common.
∴ BX = BY …………. (by c.p.c.t)
Thus, every point on the perpendicular bisector is equidistant from X and Y.
Since AX ≠ AY, A is not on the perpendicular bisector of XY.
Therefore, it is necessary to use the same radii while constructing one pair of intersecting arcs.
4. Recreate this design using only a ruler and compass —
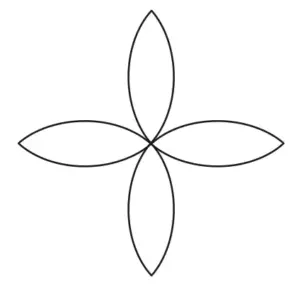
Solution:
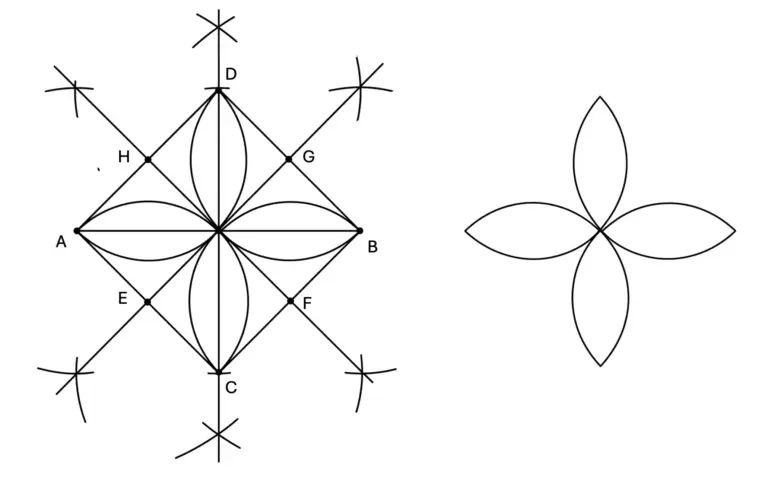
(i) Draw a line segment AB = 8 cm.
(ii) With A and B as centres, draw arcs of equal radius above and below the line AB.
(iii) Mark the points of intersection of arcs as C and D.
(iv) Join CD. Let AB and CD intersect at point O.
(v) Join AC, BC, BD, and AD to form a square.
(vi) Draw perpendicular bisectors of the sides of the square.
(vii) Let the perpendicular bisectors intersect sides AC, BC, BD, and AD at points E, F, G, and H.
(viii) From E, F, G, and H, draw semicircles to obtain the required design.
Figure it out (Page 142)
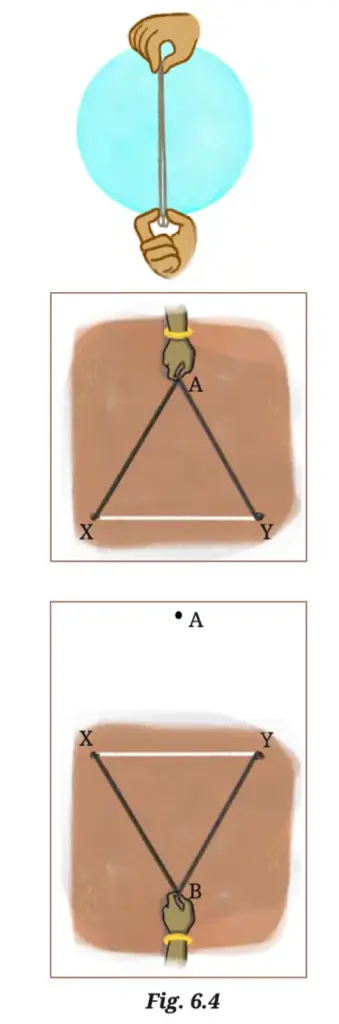
1. Justify why AB in Fig. 6.4 is the perpendicular bisector.
Solution:
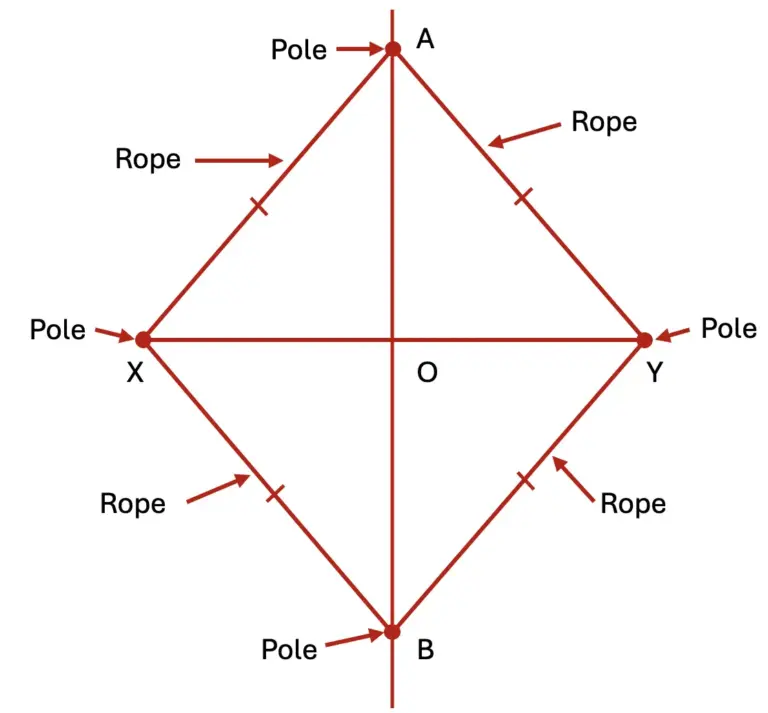
In the above figure, XAY and XBY are the lengths of the rope with A and B as their midpoints.
△ABX ≅△ABY because AX = AY, BX = BY, and AB is common.
∴ ∠XAB = ∠YAB, or ∠XAO = ∠YAO…….. (by c.p.c.t)
△AOX ≅△AOY because AX = AY, ∠XAO = ∠YAO, and AB is common.
Then, OX = OY, and ∠AOX = ∠AOY ……… (by c.p.c.t)
∴ ∠AOX + ∠AOY = 180° ………..(linear pair)
∠AOX + ∠AOX = 180°
∴ 2∠AOX = 180° or ∠AOX = 90°
Since OX = OY and ∠AOX = ∠AOY = 90°.
Therefore, AB is the perpendicular bisector of XY.
2. Can you think of different methods to construct a 90° angle at a given point on a line using a rope?
Solution:
Yes, we can construct a 90° angle at a given point on a line using the 3–4–5 Triangle Method.
Principle: A triangle with sides in the ratio 3 : 4 : 5 is a right-angled triangle.
Construction Steps:
1. Take a rope and mark three parts in the ratio 3 units, 4 units, and 5 units (for example, 30 cm, 40 cm, and 50 cm).
2. Tie the ends together to make a triangle using these three lengths.
3. Place one corner of the triangle at the given point on the line.
4. Keep one shorter side (3 or 4 units) along the given line.
5. Pull the rope tight so the triangle keeps its shape.
The angle between the 3-unit and 4-unit sides will be exactly 90°.
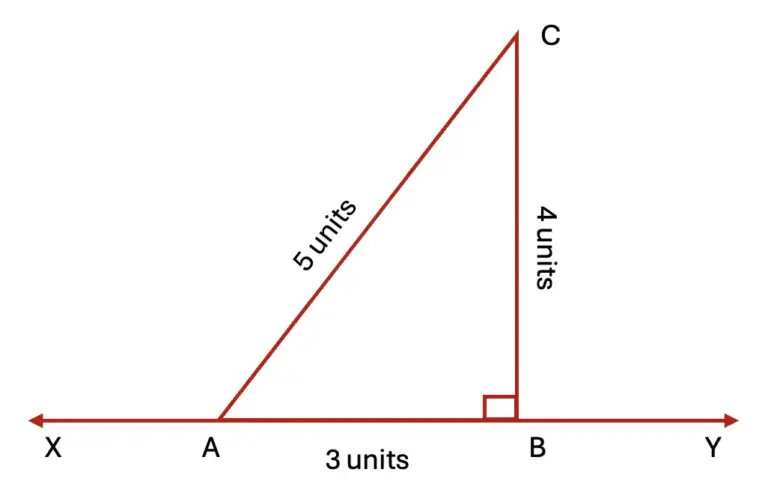
Figure it out (Page 144 – 145)
1. Construct at least 4 different angles. Draw their bisectors.
Solution:
(i) 60°
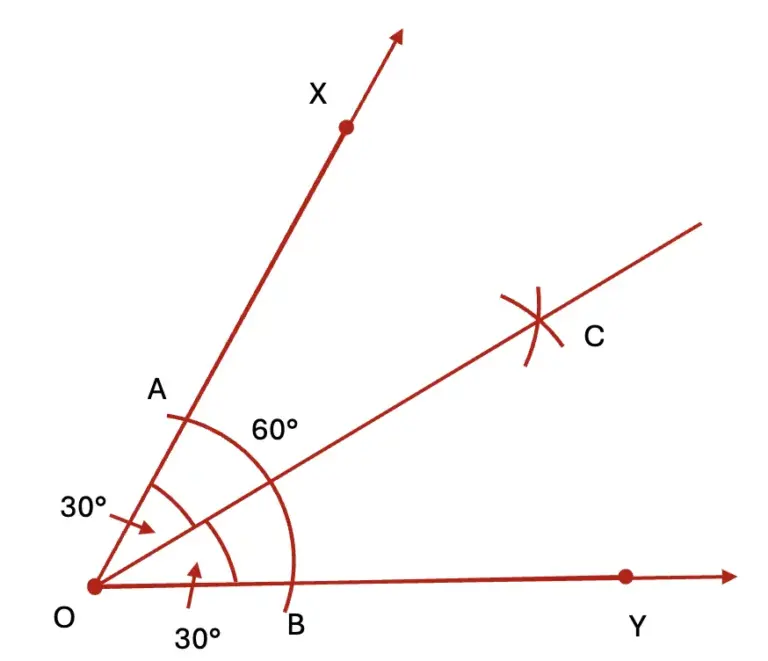
(i) Draw an angle ∠XOY = 60°.
(ii) With O as the centre and any convenient radius, draw an arc cutting at A and at B.
(iii) With A as the centre and the same radius, draw an arc.
(iv) With B as the centre and the same radius, draw another arc to intersect the previous arc at C.
(v) Join OC.
Therefore, the line OC is the bisector of ∠XOY.
(ii) 150°
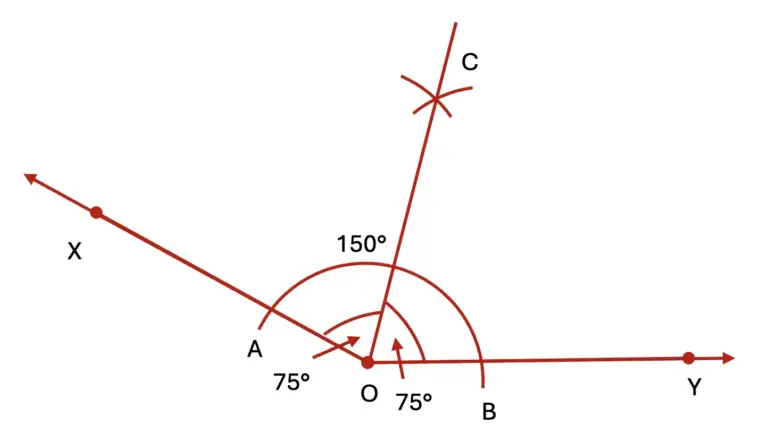
(i) Draw an angle ∠XOY = 150°.
(ii) With O as the centre and any convenient radius, draw an arc cutting at A and at B.
(iii) With A as the centre and the same radius, draw an arc.
(iv) With B as the centre and the same radius, draw another arc to intersect the previous arc at C.
(v) Join OC.
Therefore, the line OC is the bisector of ∠XOY.
(iii) 110°
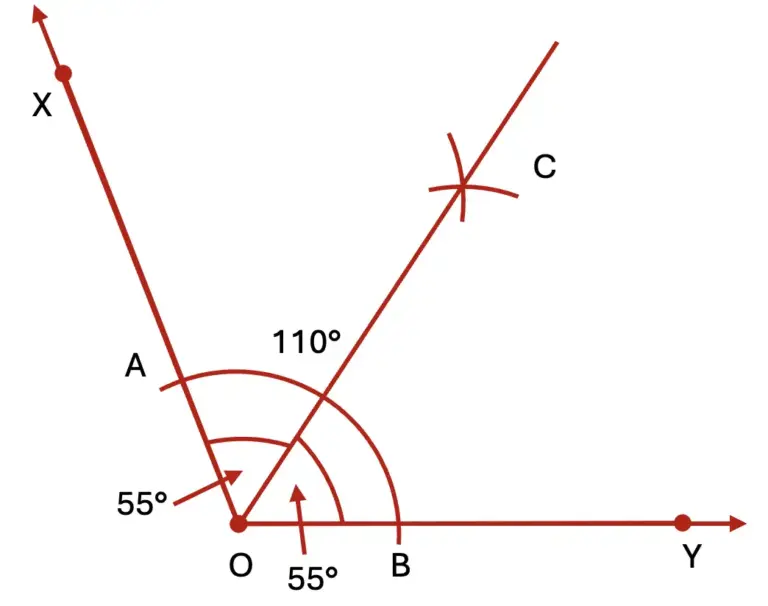
(i) Draw the angle ∠XOY = 110° with vertex at O.
(ii) With O as the centre and any convenient radius, draw an arc that cuts OX at A and OY at B.
(iii) With A as the centre and the same radius, draw an arc.
(iv) With B as the centre and the same radius, draw another arc to intersect the previous arc at C.
(v) Join OC.
Therefore, the line OC is the bisector of ∠XOY.
(iv) 80°
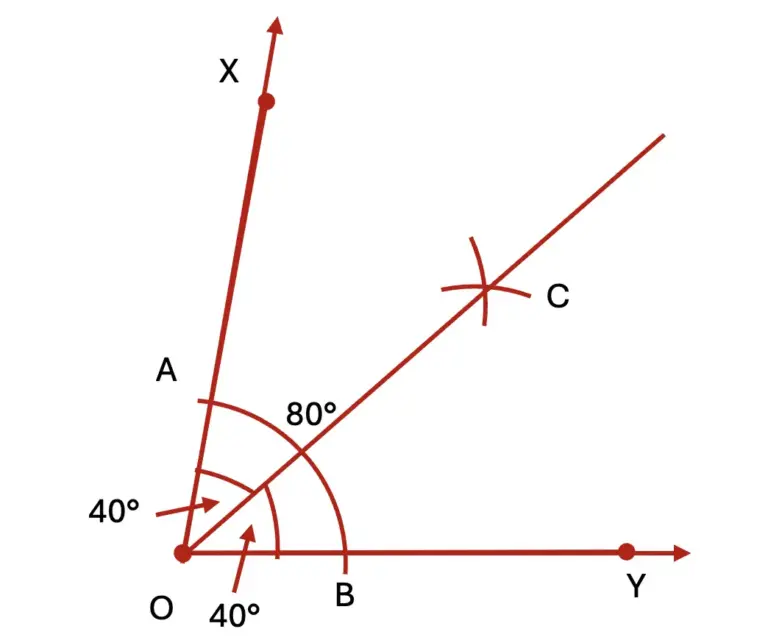
(i) Draw the angle ∠XOY = 80° with vertex at O.
(ii) With O as the centre and any convenient radius, draw an arc that cuts OX at A and OY at B.
(iii) With A as the centre and the same radius, draw an arc.
(iv) With B as the centre and the same radius, draw another arc to intersect the previous arc at C.(v) Join OC.
Therefore, the line OC is the bisector of ∠XOY.
2. Construct the 8-petalled figure shown in Fig. 6.5.
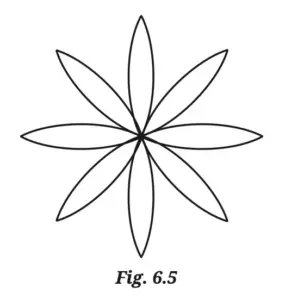
Solution:
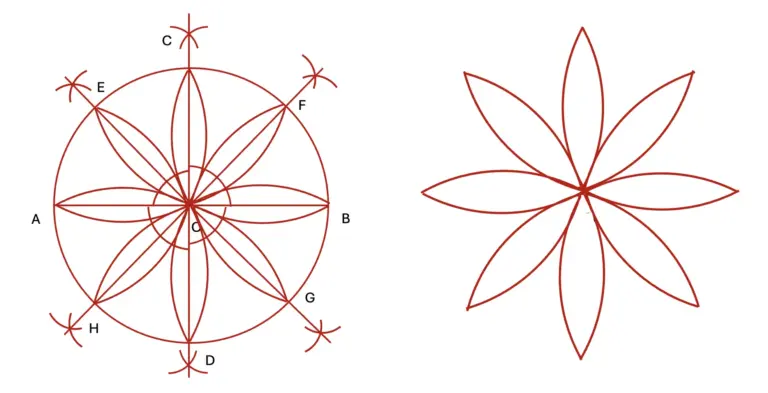
(i) Draw a line AB = 8 cm.
(ii) With A and B as centres, draw arcs of equal radius above and below the line AB.
(iii) Mark the points of intersection of arcs as C and D.
(iv) Join CD. Let AB and CD intersect at point O.
(v) Draw angle bisectors of ∠AOC, ∠BOC, ∠AOD, and ∠BOD as shown in the figure.
(vi) With O as centre and radius AO = 4cm, draw a circle.
(vii) Let the circle intersect the angle bisectors at points E, F, G, and H.
(viii) Using points A, B, C, D, E, F, G, H and the centre of the circle, draw petals as shown.
(ix) Erase extra lines, arcs, and the circle to get the required 8-petalled figure.
3. In Step 2 of angle bisection, if arcs of equal radius are drawn on the other side, as shown in the figure, will the line OC still be an angle bisector? Explore this through construction, and then justify your answer.
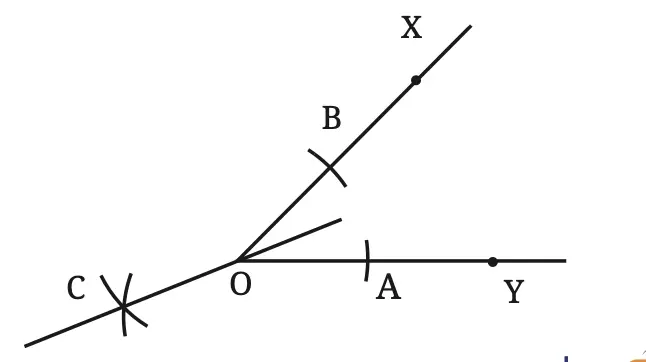
Solution:
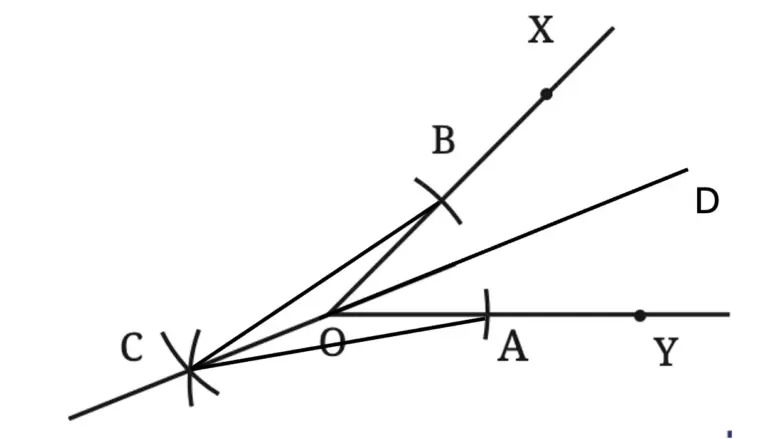
(i) Draw an angle ∠XOY.
(ii) With O as the centre and any convenient radius, draw arcs intersecting line OX at B and line OY at A.
(iii) With A and B as centres and any convenient radius, draw arcs intersecting at point C.
(iv) Join BC and AC. Extend CO to point D as shown.
Justification:
ΔOBC ≅ ΔOAC because OB = OA, BC = AC, OC is common.
∴ ∠BOC = ∠AOC ………. (by c.p.c.t)
180° – ∠BOC = 180° – ∠AOC
∴ ∠XOD = ∠YOD
Therefore, the line OC bisects ∠XOY.
4. What are the other angles that can be constructed using angle bisection? Can you construct a 65.5° angle?
Solution:
Using angle bisection, many angles can be constructed by repeatedly bisecting known angles.
For example, we can construct by bisecting , by bisecting , by bisecting , and so on.
No, a 65.5° angle cannot be constructed using only angle bisection.
5. Come up with a method to construct the angle bisector using a rope.
Solution:
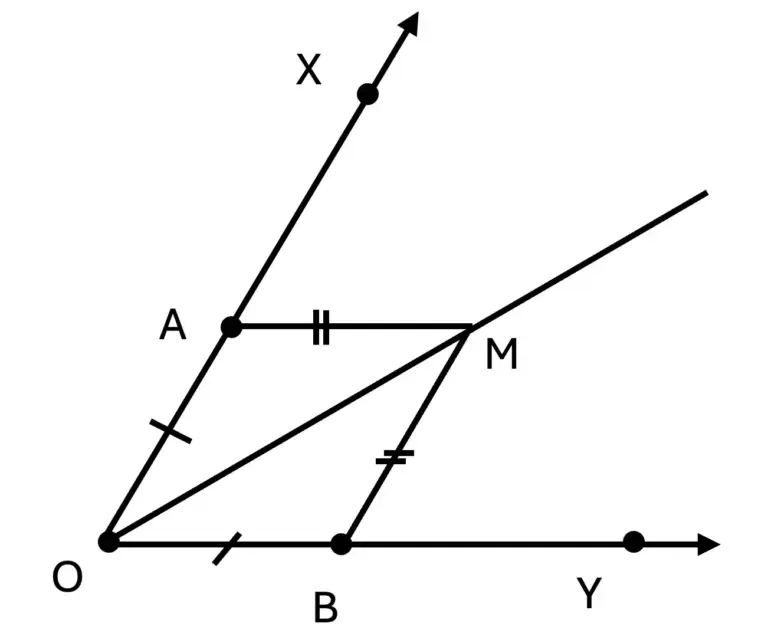
(i) Fix a pole at the vertex O of the ∠XOY.
(ii) Using a rope, mark two points A and B on the arms of the angle such that OA = OB.
(iii) Fix poles at A and B.
(iv) Take another rope, make loops at its ends, and mark its midpoint.
(v) Fasten the loops to the poles at A and B.
(vi) Pull the midpoint until both parts of the rope are fully stretched. Mark this position as M.
(vii) Join O and M. OM bisects ∠XOY.
Justification:
ΔAOM ≅ ΔBOM because OA = OB, AM = BM, OM is common.
∴ ∠AOM = ∠BOM ………. (by c.p.c.t)
Thus, OM is the angle bisector of ∠XOY.
6. Construct the following figure.
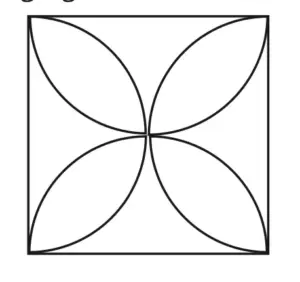
How do we construct the petals so that they are of the maximum possible size within a given square?
Solution:
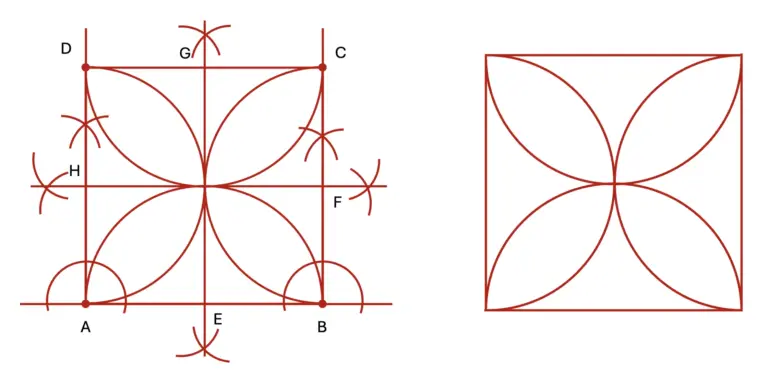
(i) Draw a square ABCD.
(ii) Draw the perpendicular bisectors of sides AB, BC, CD, and DA. Let them intersect the sides of the square at points E, F, G, and H, respectively.
(iii) With centres E, F, G, and H and radius AE (equal to half the side of the square), draw semicircles inside the square.
(iv) Erase the extra construction lines to obtain the required figure.
To get petals of the maximum possible size, construct semicircles with radius equal to half the side of the square.
Figure it Out (Page 147)
1. Construct at least 4 different angles in different orientations without taking any measurements. Make a copy of all these angles.
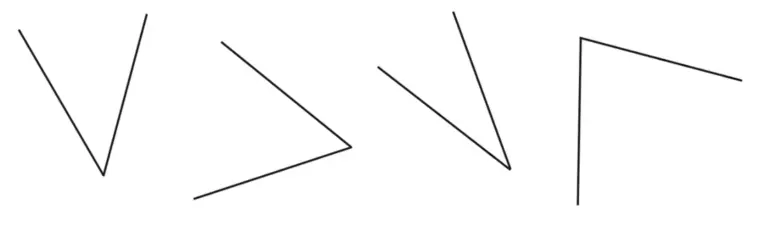
Solution:
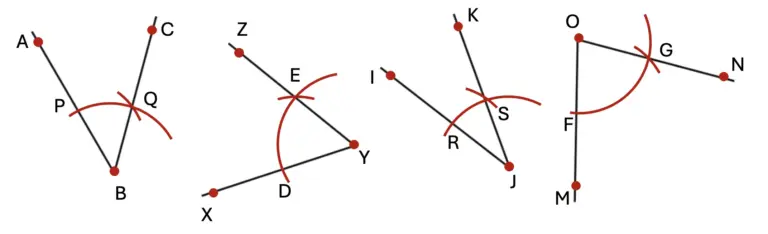
(1)
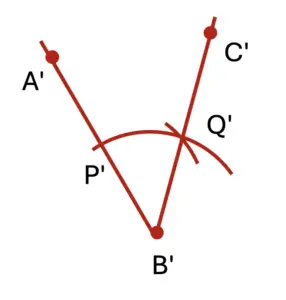
(i) Draw a line A′B′ as shown.
(ii) With B and B’ as centres, draw arcs of equal radius.
(iii) Transfer the length PQ to the arc from P′ such that P′Q′ = PQ.
(iv) Join B′ and Q′ and extend B′Q′ to point C′.
Therefore, ∠A′B′C′ is the required angle.
(2)
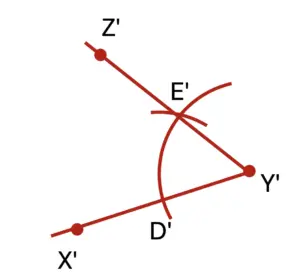
(i) Draw a line X′Y′ as shown.(ii) With Y and Y’ as centres, draw arcs of equal radius.
(iii) Transfer the length DE to the arc from D′ such that D′E′ = DE.
(iv) Join Y′ and E′ and extend Y′E′ to point Z′.
Therefore, ∠X′Y′Z′ is the required angle.
(3)
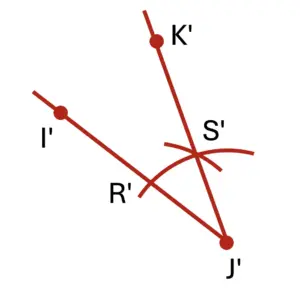
(i) Draw a line I′J′ as shown.
(ii) With J and J’ as centres, draw arcs of equal radius.
(iii) Transfer the length RS to the arc from R′ such that R′S′ = RS.
(iv) Join J′ and S′ and extend J′S′ to point K′.
Therefore, ∠I′J′K′ is the required angle.
(4)
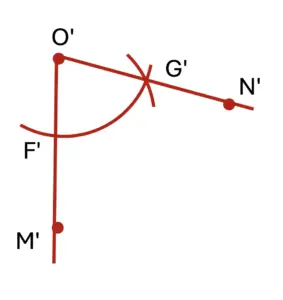
(i) Draw a line M′O′ as shown.
(ii) With O and O’ as centres, draw arcs of equal radius.
(iii) Transfer the length FG to the arc from F′ such that F′G′ = FG.
(iv) Join O′ and G′ and extend O′G′ to point N′.
Therefore, ∠M′O′N′ is the required angle.
2. Construct the Fig. 6.6.
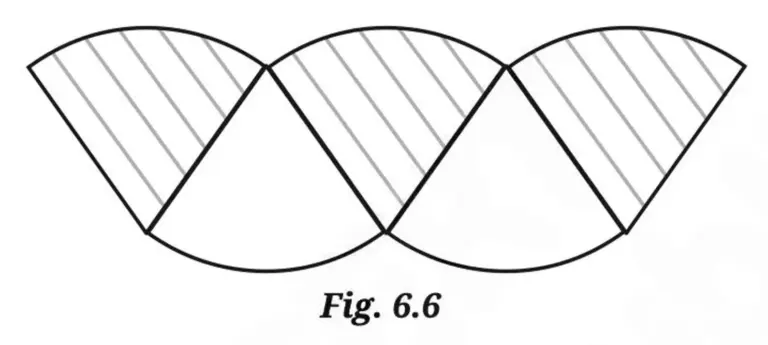
Solution:
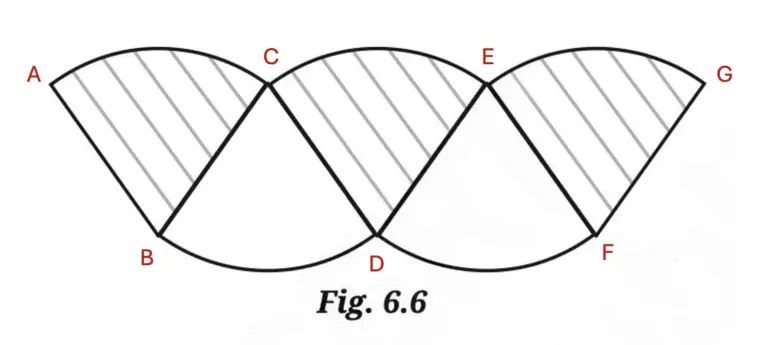
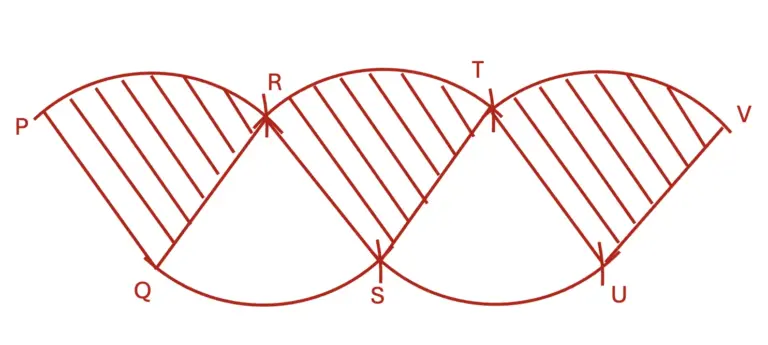
1. Draw PQ equal to AB.
2. With Q as centre and radius PQ, draw an arc. Using the compass, transfer length AC from P to locate R. Join QR and shade the sector.
3. With R as centre and radius QR, draw an arc. Transfer length BD from Q to locate S. Join RS.
4. With S as centre and radius RS, draw an arc. Transfer length CE from R to locate T. Join ST and shade the sector.
5. With T as centre and radius ST, draw an arc. Transfer length DF from S to locate U. Join TU.
6. With U as centre and radius TU, draw an arc. Transfer length EG from T to locate V. Join UV and shade the sector.
7. Erase the extra construction arcs to obtain the required figure.
Figure it Out (Page 148)
1. Construct 4 pairs of parallel lines in different orientations.
Solution:
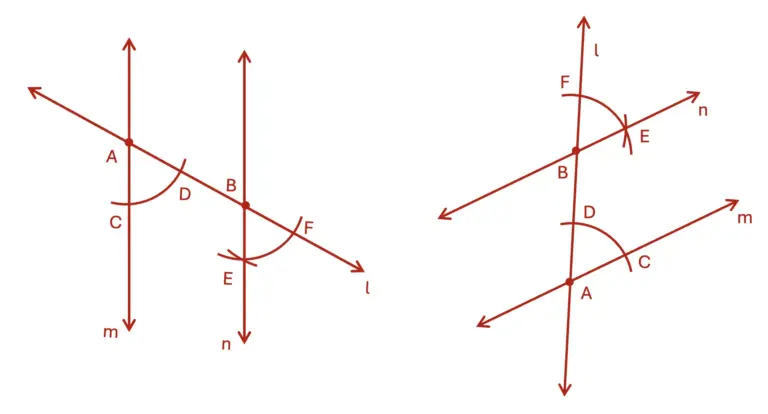
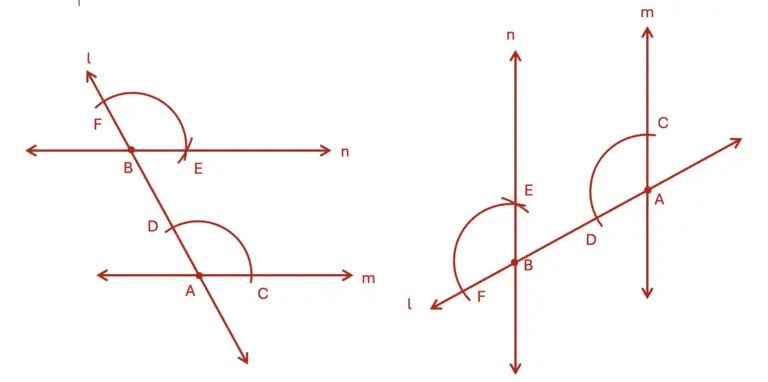
(i) Construct lines m and l intersecting at point A.
(ii) Choose a point B on l through which a parallel line is to be drawn.
(iii) Construct arcs of equal radius from A and B.
(iv) Transfer the length CD to the arc from F such that FE = DC.
(v) Join B and E and extend BE to obtain line n.
Therefore, m n and l is a transversal.
2. Construct the following figure.
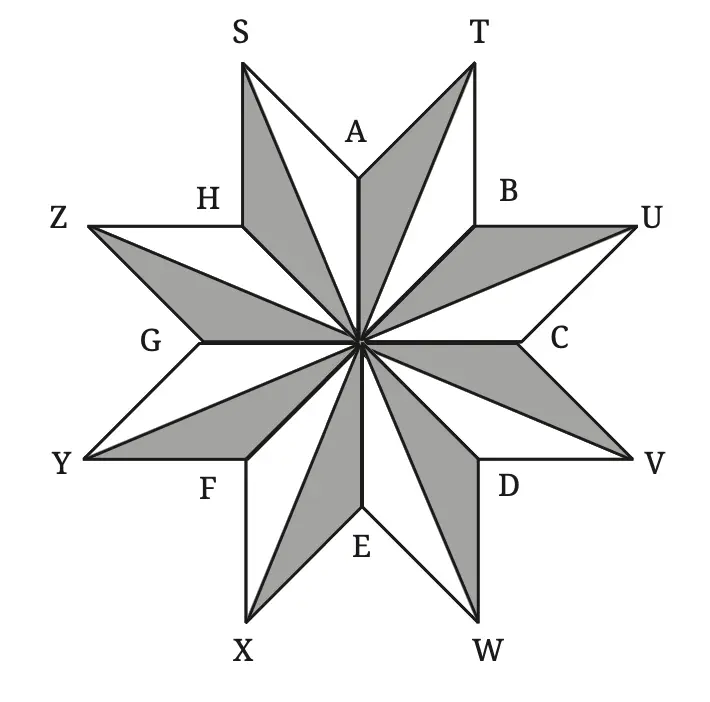
Solution:
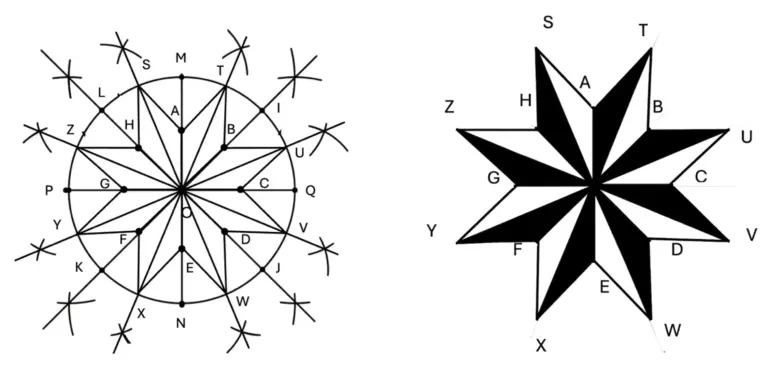
(i) Draw two perpendicular line segments MN and PQ, each of length 8 cm, intersecting at point O.
(ii) With O as centre and radius of 4 cm, draw a circle.
(iii) Draw bisectors of ∠MOQ, ∠NOQ, ∠NOP, and ∠MOP, intersecting the circle at points I, J, K, and L, respectively.
(iv) Join OI, OJ, OK, and OL.
(v) Draw bisectors of ∠MOI, ∠IOQ, ∠QOJ, ∠JON, ∠NOK, ∠KOP, ∠POL, and ∠LOM, intersecting the circle at points T, U, V, W, X, Y, Z, and S, respectively.
(vi) Join OT, OU, OV, OW, OX, OY, OZ, and OS.
(vii) Mark midpoints of OM, OI, OQ, OJ, ON, OK, OP, and OL as A, B, C, D, E, F, G, and H, respectively.
(viii) Join AT, BT, BU, CU, CV, DV, DW, EW, EX, FX, FY, GY, GZ, HZ, HA, and AS.
(ix) Darken alternate regions to complete the design.
(x) Erase the circle, extra lines, and construction arcs to obtain the required figure.
Figure it Out (Page 151)
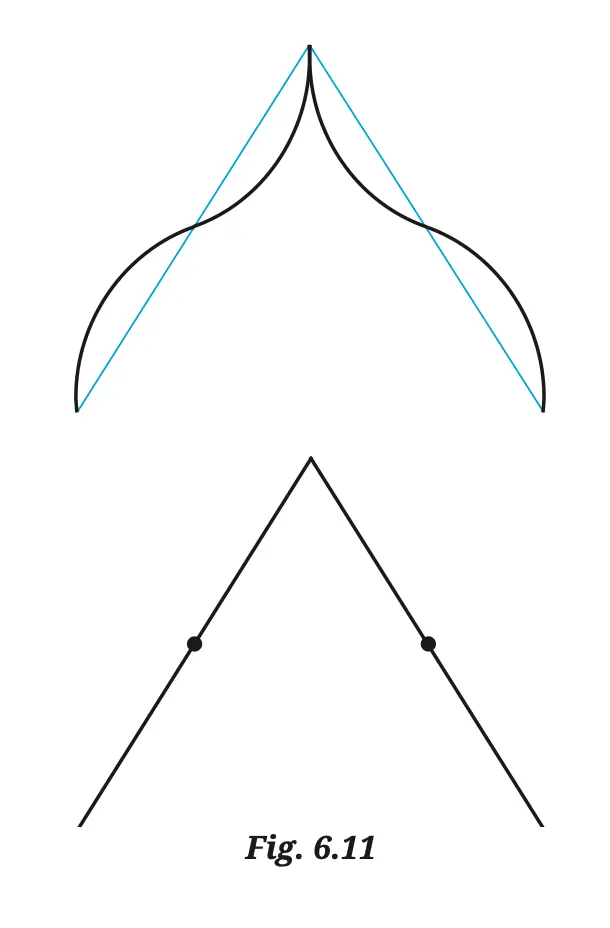
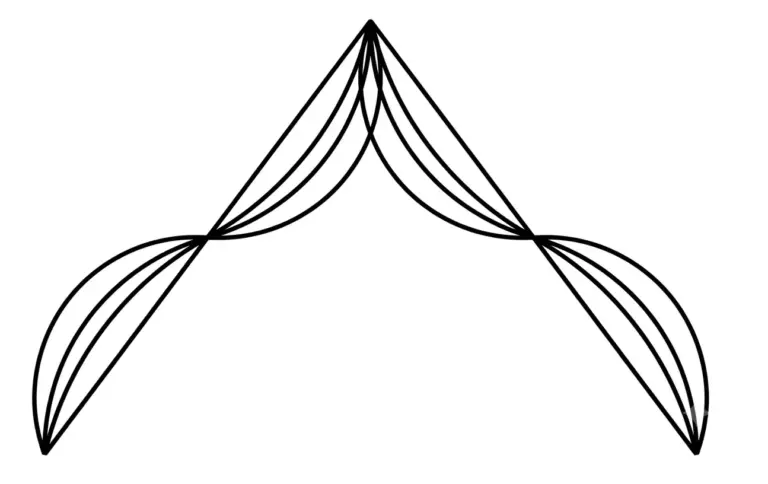
1. Use support lines in Fig. 6.11 to construct a pointed arch. Make different arches by changing the radius of the arcs.
Solution:
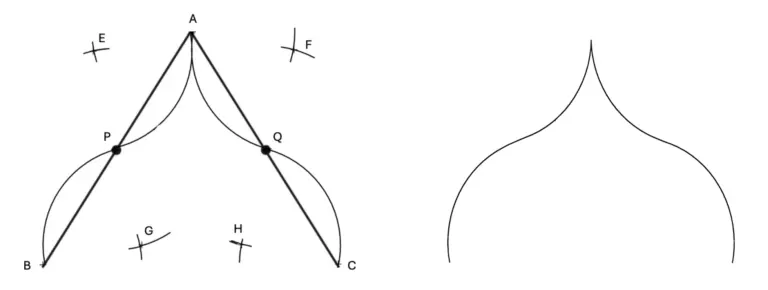
(i) Draw the support lines AB and AC.
(ii) Mark the midpoints P of AB and Q of AC.
(iii) Construct the perpendicular bisectors of AP and AQ to obtain points E and F, respectively.
(iv) With centres E and F, draw arcs from A to P and from A to Q as shown.
(v) Construct the perpendicular bisectors of PB and QC to obtain points G and H, respectively.
(vi) With centres G and H, draw arcs from P to B and from Q to C as shown.
Remove the extra arcs and the labels.
Thus, the required pointed arch is obtained.
By changing the radii of the arcs, many different pointed arches can be constructed, as shown below.
2. Make your own arch designs.
Solution:
Do it yourself.
Figure it Out (Page 154)
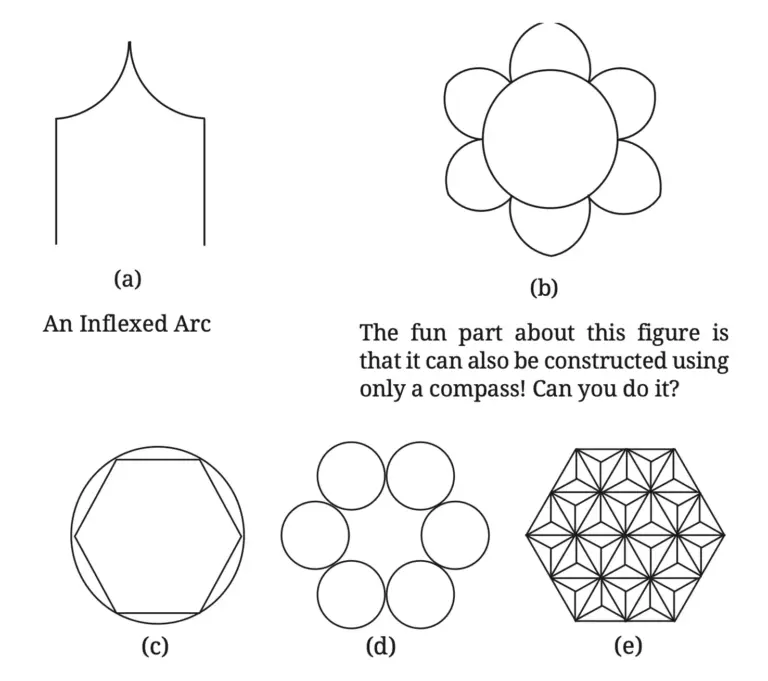
1. Construct the following figures:
Solution:
(a)
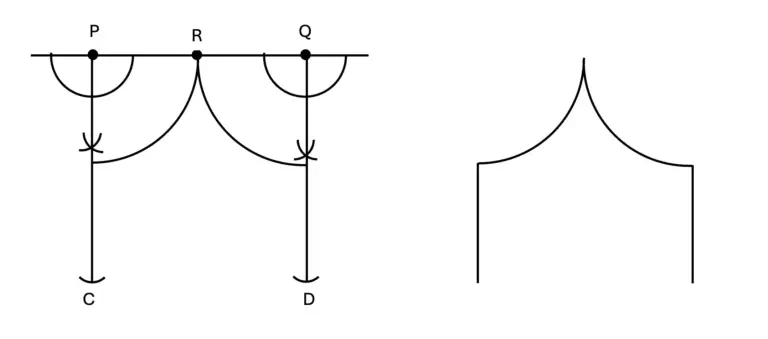
1. Draw a line segment PQ and mark its midpoint R.
2. Draw perpendiculars PA and QB at P and Q such that PA = QB.
3. With centres P and Q, and radius PR, draw the required arcs as shown.
4. Erase the extra construction lines and labels.
Thus, the required figure is obtained.
(b)
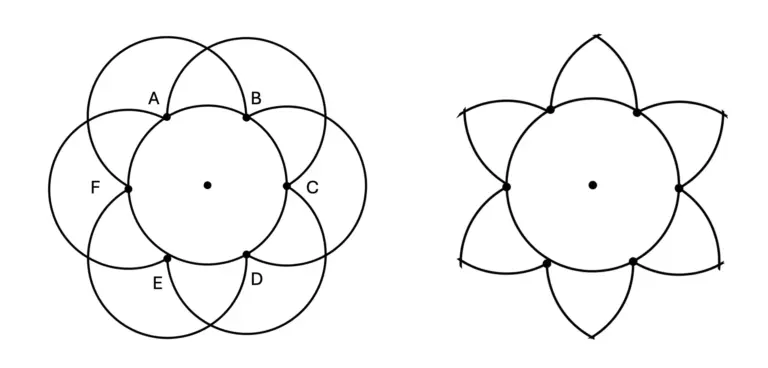
1. Draw a circle and mark a point A on its circumference.
2. With A as centre and radius equal to the circle’s radius, draw an arc cutting the circle at F and B.
3. Again with B as centre and radius equal to the circle’s radius, draw an arc cutting the circle at A and C.
4. Repeat the process and complete the pattern as shown.
Erase the extra arcs and labels.
Thus, the required figure is obtained.
(c)
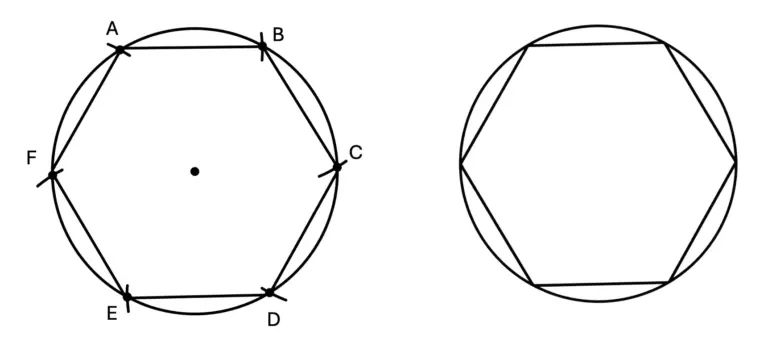
1. Draw a circle and mark a point A on its circumference.
2. With A as centre and radius equal to the circle’s radius, draw an arc cutting the circle at B.
3. Repeat the process from B, C, D, and E to obtain points C, D, E, and F.
4. Join AB, BC, CD, DE, EF, and FA.
5. Erase the extra arcs and labels.
Thus, the required figure is obtained.
(d)
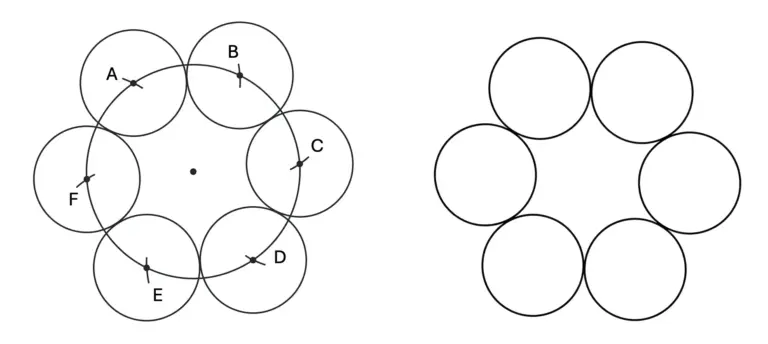
1. Draw a circle of radius 3 cm and mark a point A on its circumference.
2. With A as centre and radius 3 cm, draw an arc cutting the circle at B.
3. Repeat the process from B, C, D, and E to obtain points C, D, E, and F.
4. With centres A, B, C, D, E, and F, draw circles of radius 1.5 cm.
5. Erase the bigger circle and labels.
Thus, the required figure is obtained.
2. Optical Illusion: Do you notice anything interesting about the following figure? How does this happen? Recreate this in your notebook.

Solution:
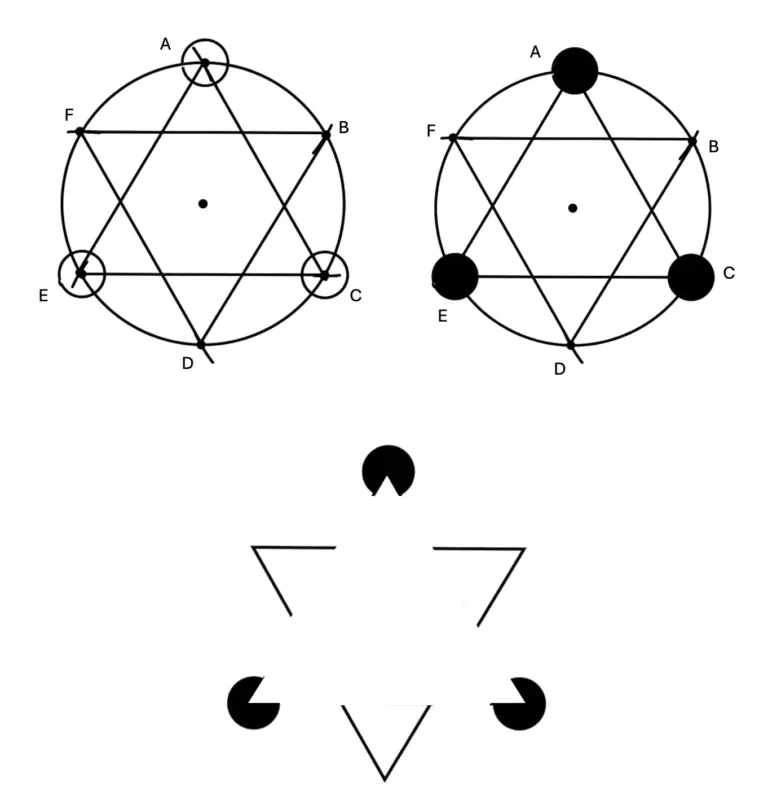
1. Draw a circle and mark a point A on its circumference.
2. With A as centre and radius equal to the circle’s radius, draw an arc cutting the circle at B.
3. Repeat the process from B, C, D, and E to obtain points C, D, E, and F.
4. Join A, E, C and F, B, D to form two equilateral triangles △AEC and △FBD.
5. Draw circles of radius 0.5 cm with centres A, E, and C and shade them black.
6. Erase the parts of the circle, △FBD, and extra construction lines.
Thus, the required figure is obtained.
Observation:
A six-pointed star appears in the centre, though it is not actually drawn. This happens because the brain completes the missing boundaries and perceives a complete shape, creating an optical illusion.
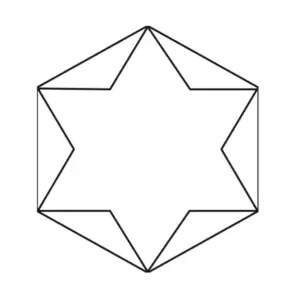
3. Construct this figure.
[Hint: Find the angles in this figure.]
Solution:
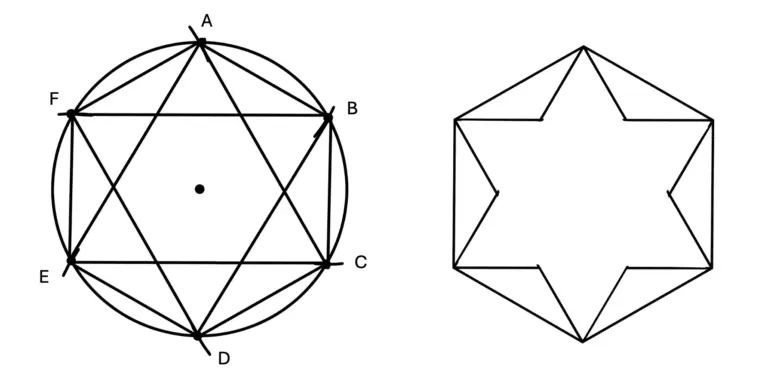
1. Draw a circle and mark a point A on its circumference.
2. With A as centre and radius equal to the circle’s radius, draw an arc cutting the circle at B.
3. Repeat the process from B, C, D, and E to obtain points C, D, E, and F.
4. Join A, E, C, and F, B, D to form two equilateral triangles △AEC and △FBD.
5. Erase the circle, arcs, and extra construction lines.
Thus, the required figure is obtained.
4. Draw a line l and mark a point P anywhere outside the line. Construct a perpendicular to the given line l through P.
[Hint: Find a line segment on l whose perpendicular bisector passes through P.]
Solution:
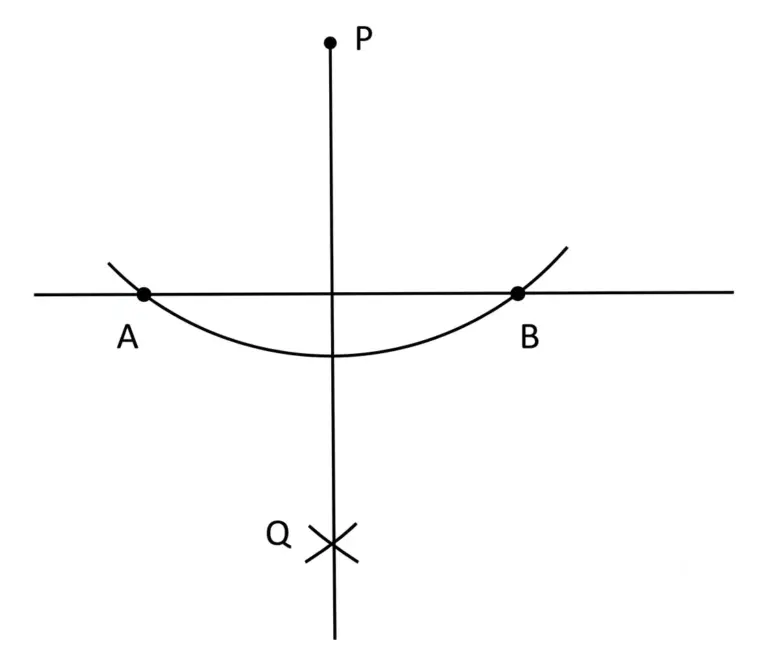
1. Draw a line l and mark a point P outside it.
2. With P as centre, draw an arc cutting l at points A and B.
3. With A and B as centres and radius greater than half of AB, draw arcs intersecting at Q.
4. Join P and Q.
The line PQ is the required perpendicular to l through P.
Figure it Out (Page 156)
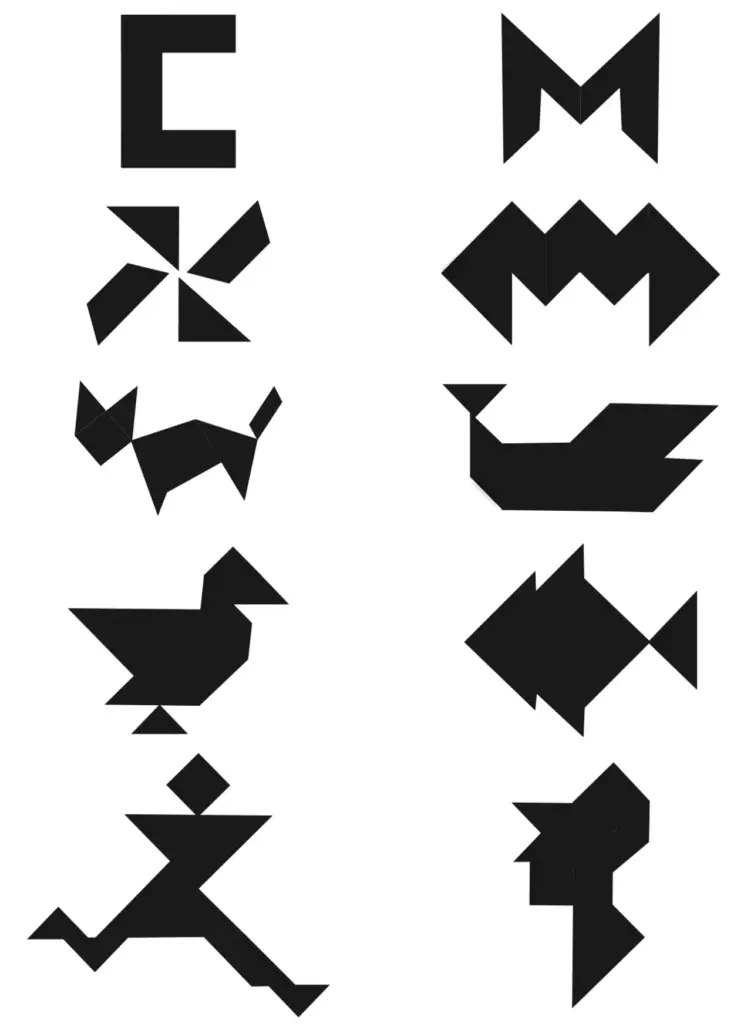
Q. How can the tangram pieces be rearranged to form each of the following figures?
Solution:
Using 7 tangram pieces from the given figure:
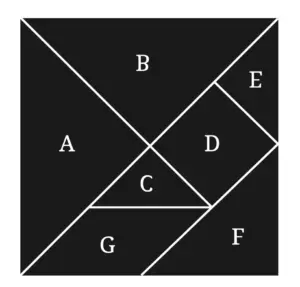
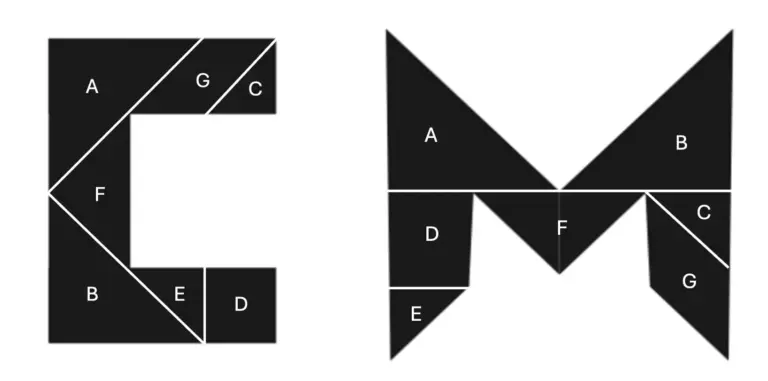
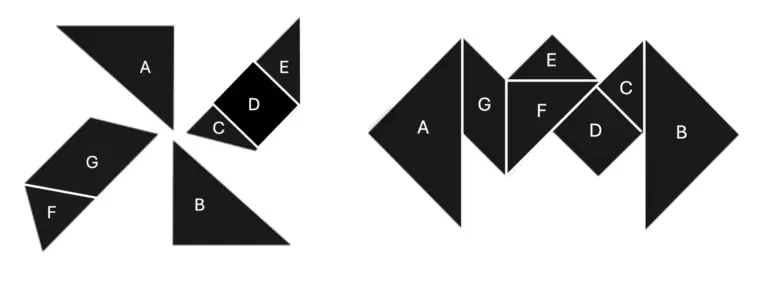
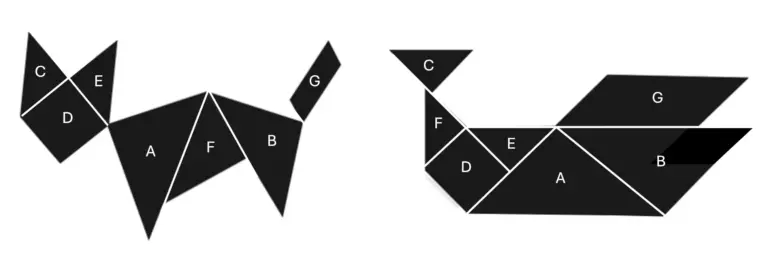
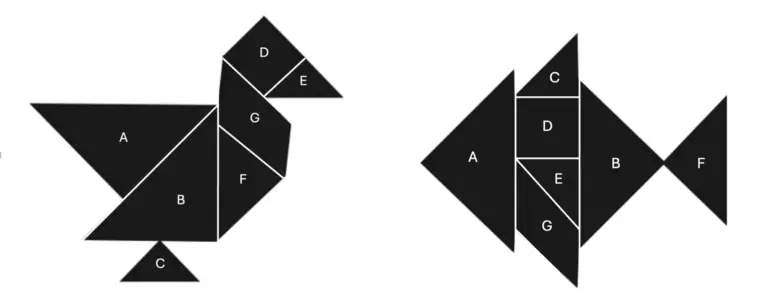
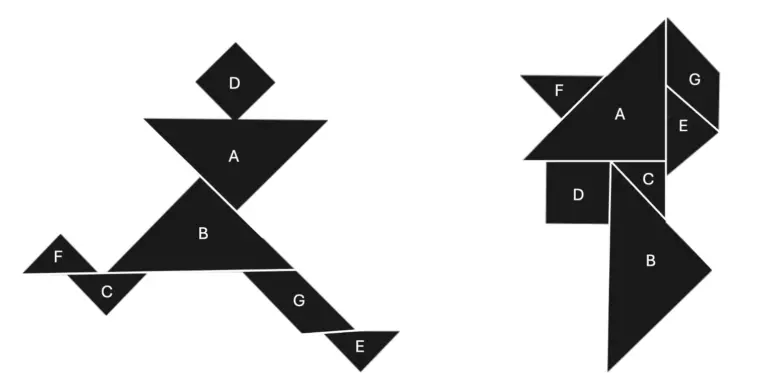
Figure it Out (Page 160)
Are the following tilings possible?
1.

Solution:
Yes, the given region can be tiled in the following way:
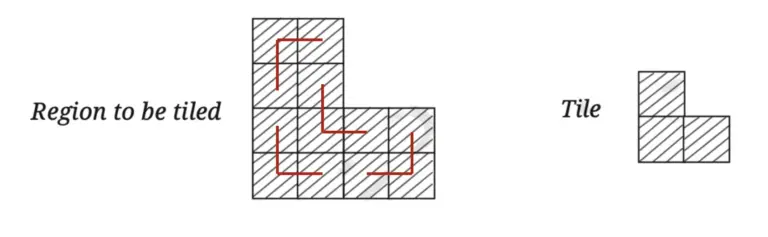
2.
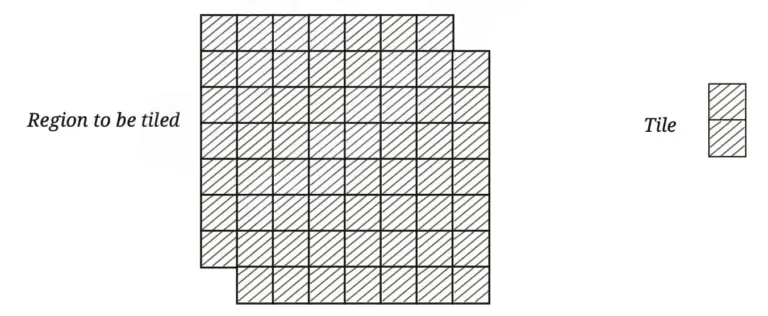
Solution:
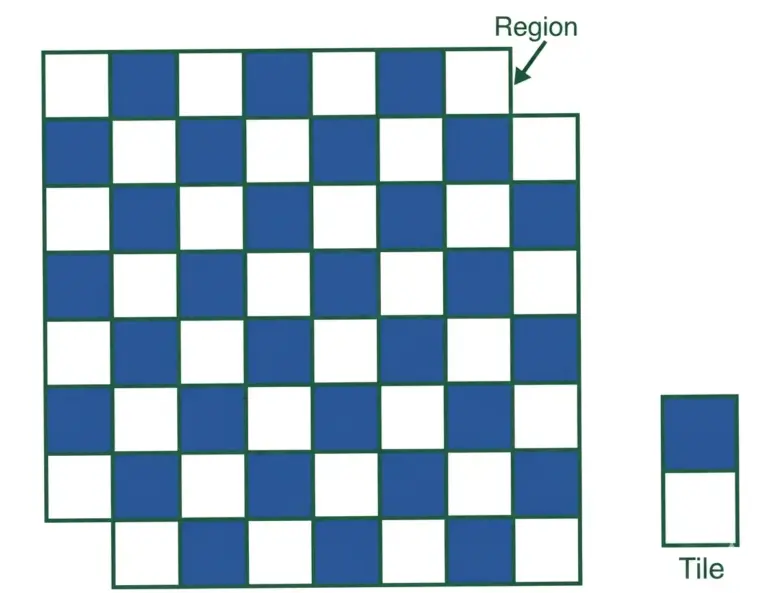
At SchoolLearners, we provide accurate, step-by-step NCERT solutions that are simple to understand and designed according to the latest CBSE syllabus. Whether you’re completing homework, preparing for exams, or revising the chapter, our solutions make learning Maths easier.
👉 Read the complete NCERT Solutions here: https://schoollearners.in/
Why Choose SchoolLearners?
- ✅ 100% NCERT-based solutions
- ✅ Simple and easy explanations
- ✅ Exam-oriented answers
- ✅ Free study material for CBSE students
- ✅ Regularly updated educational content